
Last updated October 30, 2026
Attic Insulation Maintenance Checklist for Van Nuys Homeowners
If your attic insulation has settled, shifted, or been disturbed by a pest, your air conditioner is compensating, and your utility bill is the receipt. Van Nuys homeowners spend a lot of energy thinking about their HVAC equipment: the condenser coils, the air filters, the thermostat settings. Few realize that the single largest factor in how hard that system works is hiding above the ceiling. This guide walks you through what to check, what to look for, and when to leave the attic ladder alone and call someone who does this every day. You’ll learn how to spot thermal bypasses, identify settled blown-in insulation, recognize rodent damage specific to the San Fernando Valley, and understand why Santa Ana winds expose attic weaknesses that go unnoticed the rest of the year.
Quick Answer
An attic insulation maintenance check in Van Nuys means inspecting the attic floor for settled or displaced insulation, confirming depth meets current DOE recommendations for Zone 2 (typically R-38, around 10 to 14 inches of fiberglass or cellulose), looking for rodent tunnels and droppings, checking that the attic hatch is insulated and weatherstripped, and sealing gaps around recessed can lights, wiring penetrations, and duct boots. Most homeowners should do a visual check twice a year, once before cooling season and once after Santa Ana wind events in the fall.
Table of Contents
- Why Attic Insulation Is an HVAC Performance Issue in Van Nuys
- The Visual Inspection: What You’re Looking For
- The Depth Measurement Test for Settled Blown-In Insulation
- Thermal Bypasses: Recessed Can Lights and Other Hidden Gaps
- Rodent Damage: What Valley Rats and Ground Squirrels Do to Insulation
- Santa Ana Wind Events and Attic Air Infiltration
- The Attic Hatch: The Most Overlooked Weak Point
- A Seasonal Maintenance Schedule for Van Nuys Homes
Why Attic Insulation Is an HVAC Performance Issue in Van Nuys
Van Nuys sits in a climate where the attic reaches 130 to 150 degrees on an August afternoon. That heat pushes downward through whatever separates it from your living space. If your attic floor has R-19 fiberglass batts that were installed during the original construction, you’re asking your air conditioner to fight a constant thermal load that newer, properly insulated homes simply don’t have. The physics is straightforward: heat moves from hot to cold, and your attic is the hottest part of the house. Insulation slows that movement. When insulation is compromised, compressed, or missing, the heat transfers faster, and the AC runs longer cycles to hold the thermostat setpoint.
We regularly inspect attics in Van Nuys where the original blown-in fiberglass has settled to half its intended depth. The homeowner’s AC works fine. The air filter gets changed. The thermostat is set at 78. But the system cycles on every 10 minutes during peak heat because the ceiling is radiating 90-degree heat into the rooms below. That’s not an equipment problem. That’s an insulation maintenance problem. For reference, the Thermal Insulation Co home page lays out how we approach these diagnostics, and our Attic Insulation in Van Nuys service covers the full scope of what a proper attic fix involves.
The Visual Inspection: What You’re Looking For
You don’t need specialized tools to spot most attic insulation problems. You need a flashlight, a dust mask, and the willingness to spend 15 minutes above the ceiling. Here’s what a proper visual inspection covers and what each finding means.
What to bring: a bright flashlight or headlamp, work gloves, a dust mask or N95 respirator, and a tape measure. Wear long sleeves if you’re working near fiberglass. Walk only on the ceiling joists or bring two plywood boards to kneel on. The drywall below will not support your weight.
Step 1: Scan for bare spots. Look across the attic floor for any area where you can see the drywall or the top of the ceiling joists. Insulation should cover everything uniformly. Bare spots usually mean the insulation was disturbed by a contractor, an animal, or a previous homeowner storing boxes in the attic.
Step 2: Check for compression. Insulation works by trapping air. If batts or blown-in material has been compressed, by storage boxes, foot traffic, or water weight, it loses most of its R-value. Press down gently on the insulation in several spots. Intact loose-fill should feel fluffy and spring back. Compressed insulation feels dense and compacted.
Step 3: Look for discoloration. Dark gray or black stains in fiberglass or cellulose indicate air movement, not necessarily moisture. As air leaks through the insulation, it carries dust that gets trapped in the fibers, leaving a telltale gray filter line. These are the spots where air is moving through your attic floor, and they’re exactly where heat gets in during summer.
Step 4: Check for moisture signs. In Van Nuys, attic moisture is less of a year-round issue than it is in coastal climates, but it still happens. Look for water stains on the underside of the roof decking, rust on exposed nail heads, or insulation that feels damp. These can indicate roof leaks, improperly vented bathroom fans, or condensation from an uninsulated duct system.
The Depth Measurement Test for Settled Blown-In Insulation
Blown-in insulation settles. That’s a fact of physics, not a product defect. Fiberglass loose-fill loses some loft within the first year, and cellulose settles somewhat more. The question isn’t whether it settled. It’s whether there’s still enough depth to do the job. Here’s the test anyone can do in 10 minutes.
Step 1: Find an average spot. Don’t measure near the attic hatch, near the eaves, or in a corner. Walk to the middle of the attic, or measure from several locations and average them. Eave areas are always thinner and will skew your reading.
Step 2: Push the ruler to the drywall. Insert a tape measure or yardstick straight down through the insulation until it touches the attic floor. Read the depth at the top of the insulation, not the compressed point where the ruler enters.
Step 3: Repeat in three to five locations. Depth variation is normal. What you’re looking for is the average. One thin spot near a vent might be a small issue. Consistent shallowness across the whole attic is a systemic one.
Step 4: Compare to the target. The U.S. Department of Energy places Van Nuys in climate Zone 2, which recommends R-38 for attic insulation. In practical terms, that’s roughly 10 to 14 inches of blown-in fiberglass, 10 to 12 inches of blown-in cellulose, or about 12 inches of mineral wool. If your average depth is 6 inches or less, your attic is doing half the job it should be.
What settled insulation looks like: Settled blown-in material has a uniformly flattened appearance, like a snowfall that’s been rained on. Intact, properly installed loose-fill has visible peaks and texture. If your attic looks like a flat blanket rather than a choppy sea of fibers, it has likely settled below its rated R-value. We see this constantly in Van Nuys homes built in the 1960s and 1970s, where original R-19 or even R-11 blown-in material has been in place for five decades.
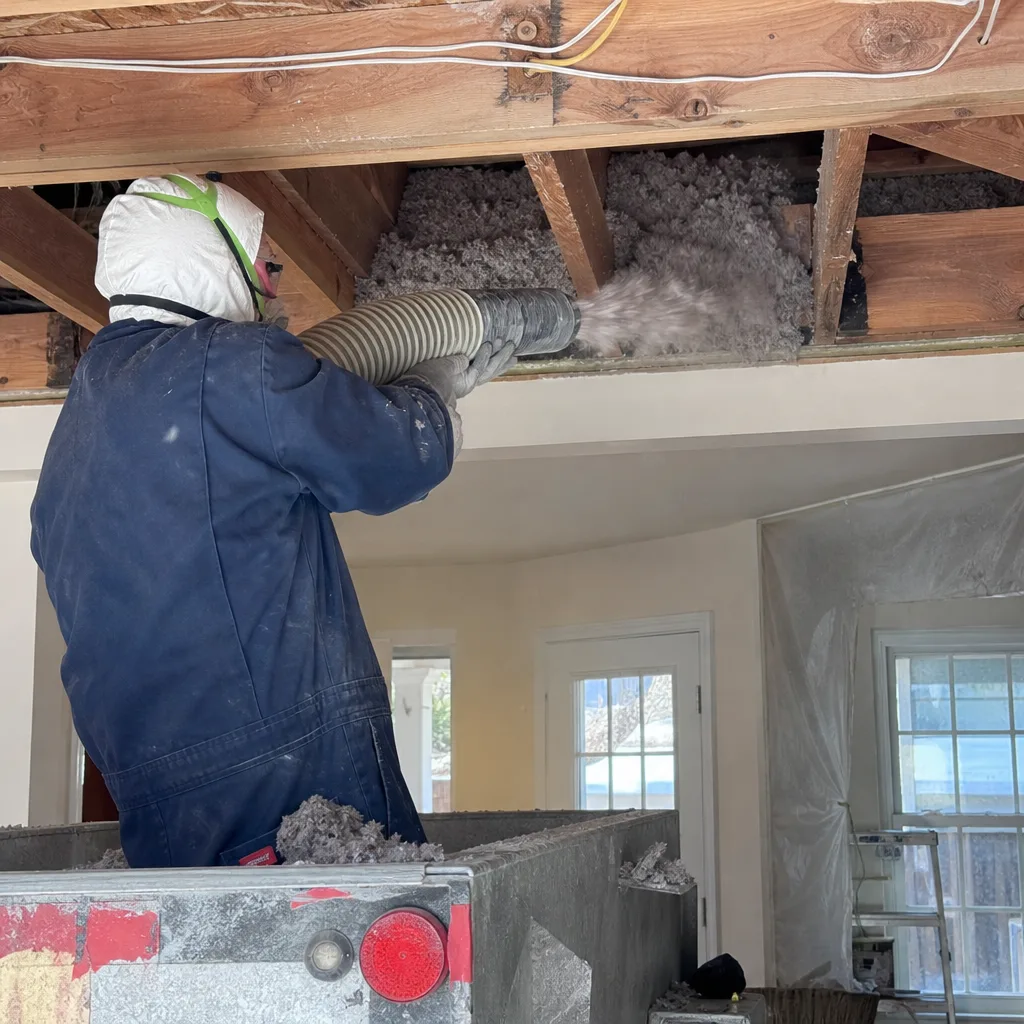
If the depth test shows you’re short, Blown In Insulation in Van Nuys is often the most cost-effective correction. We can add loose-fill directly over existing material in most cases, bringing the attic up to R-38 or higher without demolishing anything.
Thermal Bypasses: Recessed Can Lights and Other Hidden Gaps
Insulation slows conductive heat transfer. But a thermal bypass lets heat skip the insulation entirely. These are direct pathways through your attic floor: gaps around recessed lights, plumbing vent pipes, electrical wiring penetration points, and poorly sealed duct chases. In many Van Nuys homes, these bypasses add up to the equivalent of leaving a small window open year-round.
Recessed can lights are the big one. Homes built before 2010, and especially tract homes from the 1950s through 1980s, often used non-IC-rated (non-insulation-contact) recessed fixtures. These cans cannot have insulation touching them for fire safety reasons, so builders left a 3-inch gap of bare drywall around every fixture. A typical pre-2010 Van Nuys home with 8 to 12 recessed lights in the living room and kitchen can have dozens of square inches of uninsulated ceiling space. Each fixture also generates heat, which creates a thermal chimney that pulls conditioned air up into the attic.
What to check: From the attic, look for circular holes in the insulation where recessed lights poke through. If you see bare drywall or a metal can with no insulation around it, that’s a thermal bypass. In the living space, remove the trim ring and look for a label on the fixture housing. If it says “IC-rated,” insulation can safely contact it. If it says “non-IC” or has no label, you need an air-sealed cover or a fixture replacement before insulation can be installed around it.
Other bypasses to look for: plumbing vent pipes that exit through the roof create a gap where they pass through the attic floor. Bathroom exhaust fan housings are often unsealed around the perimeter. The flue from a gas water heater or furnace requires a specific fire-rated clearance, but the surrounding gap should still be sealed with metal and high-temperature caulk, not left open. And in older Van Nuys homes, whole-house fan installations are frequently left with no cover, creating a 2-foot by 3-foot hole in the ceiling that only a thin metal louver seals.
The fix for these bypasses is air sealing before adding insulation. In our experience, air sealing a typical 1,500-square-foot Van Nuys home closes the equivalent of 40 to 70 square inches of open attic bypass area. That’s a permanent improvement that no amount of added insulation can replace.
Rodent Damage: What Valley Rats and Ground Squirrels Do to Insulation
The San Fernando Valley has one of the highest rodent pressure rates in Los Angeles County. Roof rats are the primary attic invader in Van Nuys, followed by house mice and occasionally ground squirrels that gain access through openings at the foundation and work their way up wall cavities. Rats don’t just live in attic insulation. They tunnel through it, create nesting chambers, and saturate the material with urine and droppings. The result is insulation that has lost both its thermal performance and its sanitary integrity.
What rodent tunneling looks like: Walk the attic perimeter first. Rats prefer to travel along the edges, near the eaves and where the roof meets the walls. You’re looking for flattened trails through the insulation that look like small canyons or runways. These are distinct from foot traffic compression. A rat runway is narrow, 2 to 3 inches wide, and runs in straight lines along structural members. Nesting sites look like bowl-shaped depressions in the insulation, often with shredded paper, fiberglass, or leaves pulled into a central cavity.
Additional signs: Rat droppings are dark brown or black, spindle-shaped, and about 1/2 to 3/4 inch long with pointed ends. Mouse droppings are smaller, about 1/4 inch, with pointed ends. You may also see gnawed wood, chewed wire insulation, or pathways in the dust on top of air ducts. If you find these signs, the insulation in active nesting areas should be removed and replaced after the rodent issue is resolved.
Why this matters for Van Nuys specifically: The San Fernando Valley’s warm climate means rats breed year-round, not just in spring and fall. We find active infestations in attics during every month of the year. Ground squirrels are a more localized issue in areas adjacent to open lots, the Sepulveda Basin, and the edges of newer developments where natural burrows remain. Once rodents establish in an attic, their urine can saturate fiberglass batts, creating odor issues that persist even after the animals are gone. Cellulose insulation treated with borates offers some pest resistance, but no material is rodent-proof. The real fix is sealing entry points at the eave vents, roof intersections, and any pipe or conduit penetrations.
One note on Rockwool: while no insulation material repels rodents entirely, mineral wool products like Rockwool are denser and less attractive as nesting material than loose-fill fiberglass or cellulose. In Van Nuys homes with recurring rodent issues, we sometimes recommend switching to a mineral wool batt in accessible areas precisely because it doesn’t provide the same burrowable loft that rats prefer. That’s a material selection decision that comes out of the specific conditions of the home, not a generic recommendation.
Santa Ana Wind Events and Attic Air Infiltration
Santa Ana winds blow hot, dry air from the high desert through the mountain passes and into the San Fernando Valley, often at sustained speeds of 25 to 40 mph with gusts to 60 or higher. These events typically run from September through November and sometimes into December. For your attic, Santa Ana conditions create a pressure differential that exposes every air leak in the building envelope.
Here’s what happens. Wind moving across your roof creates negative pressure at the ridge and positive pressure on the windward side of the house. If your attic has soffit vents, ridge vents, or gable vents, that moving air pressurizes the attic space. Any gap in the attic floor, around a recessed light, a plumbing penetration, or a poorly sealed attic hatch, becomes a pathway for that hot, dusty air to push down into your living space. During a Santa Ana event, we hear from Van Nuys homeowners about rooms that suddenly feel drafty, a fine layer of dust on furniture near the ceiling, and furnaces that kick on more frequently even though the outdoor temperature isn’t particularly cold.
What to check after a Santa Ana event: First, inspect the attic floor for new dust trails. Santa Ana winds carry fine particulate from the desert, and that dust shows up as tan or light brown streaks on the surface of insulation near air bypass openings. Second, check the attic hatch. A hatch that isn’t weatherstripped will show dust accumulation around the perimeter in the hallway below. Third, look at the insulation near the eaves. High wind can physically disturb loose-fill material near soffit vents, pushing it back from the eave edges and creating a 1 to 2 foot band of uninsulated attic floor around the perimeter.
Homes with Icynene or Demilec spray foam installed directly against the roof deck behave differently. When the attic is sealed and conditioned as part of the building envelope, Santa Ana pressure differentials have far less effect because there’s no vented attic space to pressurize. That’s one reason we carry both open-cell and closed-cell foam products: for some Van Nuys homes, particularly those with ductwork in the attic or vaulted ceilings, Spray Foam Insulation in Van Nuys is the higher-performing solution than vented attic insulation. It’s a question of how the house is configured, not a blanket recommendation.
The Attic Hatch: The Most Overlooked Weak Point
Every attic access point is a hole in your ceiling. In most Van Nuys homes, the attic hatch is a piece of 1/2-inch drywall or plywood sitting on a wood frame, with no insulation on top and no gasket around the edge. In terms of R-value, that hatch might be R-1. The surrounding attic floor might be R-38. That single 2-foot by 2-foot opening is a severe thermal weak point, and it’s the one attic component you can inspect and improve without hiring anyone.
How to check your attic hatch: From below, push up gently on the hatch panel. If it moves more than a quarter inch, the seal is inadequate. You should feel resistance from weatherstripping. Next, get into the attic and look at the top side of the hatch. Is there insulation attached to the panel? In many older homes, the answer is no. Even where insulation was added, it’s often a loose batt that has fallen off or shifted to one side, leaving half the hatch unprotected.
What a proper hatch looks like: The hatch panel should have rigid foam board insulation attached to the top side, cut to fit the opening. Depth depends on the foam’s R-value per inch, but in Van Nuys you want at least R-19 at the hatch, and more is better. The perimeter should have closed-cell foam weatherstripping or a compressible gasket that creates a tight seal when the panel is closed. The panel should be pulled down firmly by a latch or hook-and-eye system, not just resting on the frame. A loose hatch is an air leak, and in a vented attic, that’s a direct connection between your hallway and the 140-degree attic air in August.
We find improperly sealed attic hatches in roughly 7 out of 10 homes we inspect in Van Nuys. It’s the single most common insulation defect, and it’s also one of the easiest and least expensive to correct. If you do nothing else on this checklist, inspect the hatch. If it’s uninsulated or unsealed, fix it before you spend money anywhere else in the attic.
A Seasonal Maintenance Schedule for Van Nuys Homes
Attic insulation doesn’t need monthly attention. It needs consistent, seasonal attention at the right times. Van Nuys has a Mediterranean climate with a hot-summer, mild-winter pattern that shapes when attic problems become visible and when they cause the most financial damage.
Late spring (May to early June): This is the critical inspection window. The first heat waves have arrived, but the worst of the summer hasn’t hit. Do a full visual inspection and depth test. Correct any issues before July and August, when the attic reaches peak temperature and AC loads are highest. If you’re going to add insulation or air sealing, this is when the work pays for itself fastest.
Late fall (October to November): After the first Santa Ana wind events, do a focused check for wind disturbance, dust trails, and any signs that loose-fill has shifted near the eaves. Check the attic hatch seal, since temperature swings cause the weatherstripping to compress and lose effectiveness. Rodent activity also increases as nighttime temperatures drop, so this is a good time to look for new droppings or tunneling.
After any roof work: If you have your roof replaced, repaired, or even inspected by someone walking on the roof, check the attic afterward. Roofing crews can dislodge insulation near eave vents, and any new roof penetrations for vents or skylights will have gaps at the attic floor level.
After any pest treatment: If you’ve had an exterminator treat for rodents, termites, or other pests, have the attic inspected once the treatment is complete. The insulation may have been disturbed during treatment, and any dead-zone cleanup or nesting removal may have left bare spots.
During the first heat wave of each summer: Pay attention to room-by-room temperature differences. If one room runs 5 degrees hotter than the rest of the house, and that room is under an attic area with thin or missing insulation, you’ve identified a target area. This is how we find thermal bypasses that a visual inspection alone might miss.
Common Mistakes to Avoid
- Checking only total depth and ignoring bare spots. An attic can average 12 inches of insulation while still having a 5-square-foot bare area above a bedroom. Heat finds the path of least resistance, and one bare spot can undo the benefit of the surrounding material. Walk the full attic, not just the center.
- Adding insulation over old rodent-damaged material. Blowing new cellulose or fiberglass over rat-infested batts seals the problem into the attic. The damaged material should be removed, the area sanitized, and entry points sealed before new insulation goes in.
- Sealing the attic hatch with a latch but no weatherstripping. A latch that pulls a hatch tight does nothing if there’s no compressible gasket between the panel and the frame. You need both the seal and the pressure to make it work.
- Assuming newer homes don’t have attic problems. We’ve found significant thermal bypasses in Van Nuys homes built after 2010. Code-required insulation levels are a minimum, and production builders don’t always air-seal penetrations as thoroughly as they should. New doesn’t mean problem-free.
- Using the attic for storage on top of the insulation. Every box you place on the attic floor compresses the insulation beneath it. If you need attic storage, build a raised platform above the insulation level, not on it. Compressed fiberglass at R-38 performs closer to R-20.
- Checking insulation only when the AC bill spikes. By the time the bill shows a problem, the attic has been underperforming for months. Seasonal checking catches issues before they become utility bill problems. The cheapest attic fix is the one you do before the heat season starts.
- Sealing around non-IC recessed lights with spray foam. This is a fire hazard. Non-IC-rated fixtures must maintain clearance, or they need an approved cover. If you’re not sure whether your cans are IC-rated, don’t guess. That’s a professional assessment.
When to Call a Professional
Some attic issues are obvious enough to spot but risky to fix yourself. Non-IC-rated recessed lights that need air-sealed covers, rodent-infested insulation that requires removal and sanitation, and structural air-sealing around flues or chimneys all carry fire or health risks that call for trained handling. If your depth test shows insulation under 8 inches, or if you’ve found active rodent signs, or if you suspect the original material might contain asbestos (common in pre-1980 Van Nuys homes with vermiculite), the correct move is to stop and get an assessment. The attic is also physically hazardous: extreme heat, exposed nails, and unstable walking surfaces are standard conditions. Not every homeowner should be doing DIY work above the ceiling.
Thermal Insulation Co offers free estimates in Van Nuys, covering Attic Insulation in Van Nuys, Spray Foam Insulation in Van Nuys, and Blown In Insulation in Van Nuys. We carry CertainTeed fiberglass, Rockwool mineral wool, Icynene and Demilec spray foam, and GreenFiber cellulose, so the recommendation is based on what your attic actually needs, not what we happen to stock. For an assessment of your attic insulation condition, call (855) 382-3451.
Frequently Asked Questions
Twice a year is the right cadence for most Van Nuys homes: once in late spring before cooling season ramps up, and once in late fall after Santa Ana wind events. Homes with known rodent pressure or older recessed lighting may benefit from more frequent checks. Call (855) 382-3451 if you’d rather have a professional do the inspection.
Measure the depth with a ruler in three to five spots across the attic floor. If the average is below 10 inches of blown-in fiberglass or cellulose, you’re below the DOE-recommended R-38 for Van Nuys’s climate zone. Settled material looks uniformly flat and heavily compacted. Intact loose-fill has visible texture and peaks.
In many cases, yes. If the existing insulation is dry, free of rodent contamination, and not compressed, adding blown-in loose-fill on top is a standard and effective approach. If the old material is water-damaged, heavily rodent-soiled, or contains vermiculite that may include asbestos, the old material needs professional removal first.
Rat damage appears as narrow, 2 to 3 inch wide compressed runways through the insulation, often along the attic perimeter. Look for bowl-shaped nesting depressions, spindle-shaped droppings about 1/2 to 3/4 inch long, and gnaw marks on wood or wiring. In Van Nuys, roof rats are the primary culprit and are active year-round.
Yes. Even a properly functioning air conditioner runs longer and harder when the attic insulation is below code. The attic is the largest single source of heat gain in a Van Nuys home during summer. Bringing insulation up to R-38 and air-sealing bypasses reduces runtime, evens out room temperatures, and extends equipment life.
Cost depends on attic size, material choice, removal needs, and air-sealing scope. A typical Van Nuys attic can range from $1,800 to $4,500 for blown-in installation over existing material, with higher costs when old insulation removal or spray foam application is involved. For an exact quote based on your attic, call (855) 382-3451. Estimates are free.
The Bottom Line
Attic insulation is not a set-it-and-forget-it building component. It settles, shifts, gets disturbed by pests, and gets bypassed by gaps around lights and pipes. In Van Nuys, where summer attic temperatures exceed 130 degrees and Santa Ana winds pressure-test the building envelope every fall, those failures show up as higher AC bills, uneven room temperatures, and dust in the living space. You don’t need to become an insulation expert. You need a 15-minute seasonal inspection, a tape measure for depth checks, and the willingness to call a professional when the findings go beyond a simple fix. The attic is where your HVAC system’s fight begins. Keeping the insulation in shape means the system doesn’t have to fight nearly as hard.
Written by the team at Thermal Insulation Co, serving Van Nuys since 2012.